
Protect Tint, Paint, and Dash When Removing Permit Adhesive for Drivers

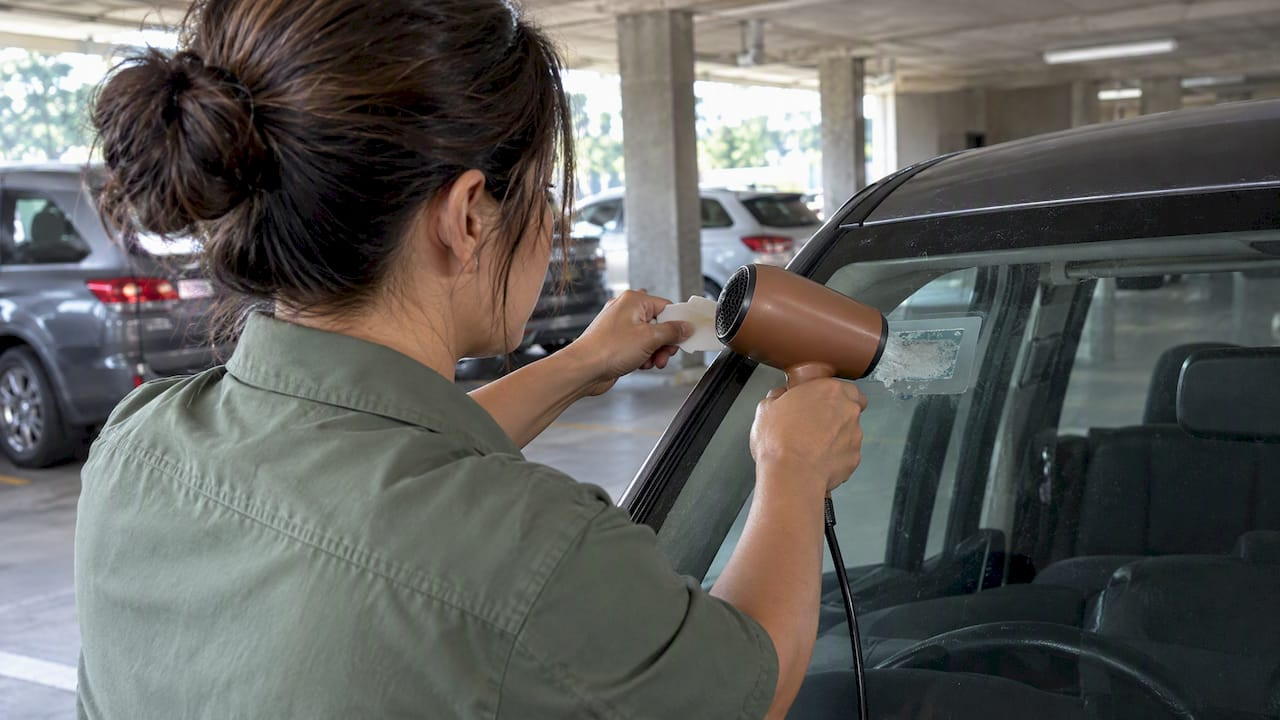
The safest way to remove parking permit adhesive is a gentle-first approach: warm the adhesive, lift it at a low angle, let a vehicle-safe solvent dwell for a few minutes, then wipe with a plastic scraper or microfiber cloth. Safe solvent choices include citrus or d-limonene cleaners, isopropyl alcohol, and automotive adhesive removers. Always test a small, hidden area first since adhesives and surfaces react differently from one vehicle to the next.
TL;DR:
- Using low heat and gentle peeling reduces the risk of damage, especially on sensitive surfaces like tint and paint.
- Citrus, isopropyl alcohol, and automotive removers are effective but must be tested first to avoid surface discoloration or deterioration.
- Proper technique involves peeling at a shallow angle, applying solvent after initial lifting, and avoiding direct solvent spray to prevent overspray.
- Clean the surface thoroughly with soap or glass cleaner after removal, and reapply protection like wax or sealant to restore the surface.
- For stubborn or baked-on adhesive, professional removal may be safer to prevent damage or residue buildup.
Table of Contents
- Supplies and a quick removal checklist
- Different vehicle surfaces need different handling
- Choosing the right solvent and handling it safely
- Getting the technique right: angle, heat, and tools
- Cleaning up and protecting the surface afterward
- When a professional is the safer call
- What permit design gets right or wrong about residue
- Choosing permit decals that are easier to remove later
- Sources
- FAQ
Supplies and a quick removal checklist
Before touching the permit, gather a short list of tools. Having everything within reach keeps the job moving and reduces the temptation to rush a step, which is usually when scratches happen.
- Hair dryer or heat gun set to low heat
- Plastic razor blade or plastic scraper
- Microfiber cloths, several if possible
- Isopropyl alcohol at 70% or higher
- Citrus-based adhesive remover or an automotive adhesive remover
- Disposable gloves
Once the supplies are ready, work through the process in order rather than skipping to solvent or scraping right away.
- Warm the permit and surrounding area for 30 to 60 seconds.
- Free one corner with a fingernail or the edge of the plastic scraper.
- Peel slowly at a low angle rather than pulling straight up.
- Apply solvent to a cloth, press it against any remaining residue, and let it sit.
- Lift the softened residue with the plastic scraper.
- Clean the area and check for leftover tack before moving on.
Three reminders carry across every surface. Always test a small, inconspicuous spot first, since AAA’s own removal guidance recommends warming the adhesive and checking a hidden area before using any chemical remover. Keep metal blades away from tint and paint. And crack a window or work in open air whenever a solvent is in use, since fumes build up quickly in a closed cabin.
Different vehicle surfaces need different handling
A method that works on glass can ruin tint, and what is safe on a dashboard might streak or discolor paint. Treating every surface the same way is the most common cause of avoidable damage.

Glass tolerates the most heat and the widest range of solvents. Warm the permit with a hair dryer, lift a corner, and peel at a low angle. A plastic scraper held nearly flat against the glass lifts stubborn residue without scratching, and a final pass with isopropyl alcohol or glass cleaner removes any film left behind.
Window tint is far less forgiving. Avery Dennison’s decal removal bulletin calls for lifting at a shallow angle, under 45 degrees where possible, and using the heat method before reaching for chemicals. Metal blades and strong solvents applied directly to tint can lift the film at the edges or cause delamination. Dampen a cloth with remover and hold it against the residue instead of pouring solvent on the glass, and keep heat low and brief.
Paint and clear coat respond well to citrus-based removers or automotive adhesive removers, but abrasive scrubbing is the enemy here. AAA Club Alliance’s guidance on tar and adhesive removal points to oil-based products and patience, noting that embedded grit from aggressive wiping can scratch a clear coat. Wash and wax the area immediately after removal, since most removers strip whatever protective layer was there.
Dashboards, plastic trim, and vinyl call for the gentlest options on the list. Oil-based cleaners work well here, while strong alcohol or citrus solvents can discolor or dull some plastics over time. Wipe gently, check the result before reapplying, and avoid letting solvent pool in seams or vents.
Pro Tip: Work in small sections, about the size of your palm, so heat and solvent do not dry out before you get to the peeling and wiping stage.
Choosing the right solvent and handling it safely
Not every adhesive remover is built the same way, and picking the wrong one can cause more harm than the residue itself.
- Citrus or d-limonene cleaners break down adhesive gently and work well on paint, glass, and most plastics.
- Isopropyl alcohol cuts through light residue and evaporates cleanly, making it a solid choice for glass and metal trim.
- Automotive adhesive removers, including products from 3M, are formulated specifically for vehicle surfaces. 3M’s adhesive remover line is designed to dissolve many non-curing adhesives without streaking, and the company recommends checking the product’s safety data sheet for handling and ventilation details before use.
Dwell time matters more than most people expect. Letting a solvent sit on the residue for several minutes gives it time to break down the adhesive bond, so the residue lifts away rather than smears across the surface.
Avoid dwell-and-scrub mistakes: residue that has not had time to soften will drag grit across paint or tint the moment you start scraping, which is how a quick job turns into a scratch.
A few handling habits make the process safer for both the vehicle and the person doing the work. Apply solvent to a cloth rather than spraying it directly onto the surface, since overspray can reach rubber seals, trim, or tint edges it was never meant to touch. Ventilate the space, and wear gloves if you are working with alcohol or stronger automotive removers for more than a few minutes.
Skip industrial solvents like MEK or toluene. They are formulated for manufacturing settings, not painted or tinted automotive surfaces, and consumer automotive adhesive removers are built with vehicle finishes in mind.
Getting the technique right: angle, heat, and tools
The difference between a clean removal and a mess usually comes down to three things: the angle of the peel, how the heat is applied, and what tool touches the surface.
- Warm the permit for 30 to 60 seconds, holding a hair dryer 6 to 12 inches from the surface for small areas.
- Free one corner, then peel at an angle under 45 degrees rather than pulling straight up, which reduces how much adhesive transfers to the paint or glass.
- For stubborn permits, fold the material back on itself near 180 degrees as you peel, a technique that keeps tension even and limits tearing.
- Apply solvent to the trailing edge as you go, letting it dwell for a minute before continuing the peel.
- Wipe the area with a microfiber cloth, reapplying solvent as needed for any leftover film.
Plastic razors and squeegees are the right tools for this job, never metal blades on tint or paint. Hold the scraper nearly flat against the surface and let the edge do the work rather than pressing down, which is what causes gouges in softer finishes.
Pro Tip: If the permit is baked on from months of sun exposure, warm it twice, once before peeling and again right before the solvent step, rather than cranking the heat higher in one pass.
Cleaning up and protecting the surface afterward
Removing the permit is only half the job. The surface needs a proper cleanup to get rid of solvent residue and restore whatever protection was stripped away.
- Wash the area with automotive soap and water to remove any remaining solvent film.
- Use glass cleaner on windows for a streak-free finish.
- Reapply wax, sealant, or a ceramic coating on paint if the prior protective layer was removed during cleaning.
- Check tint and trim edges for lifting, and avoid applying solvent again right at the borders.
Acting quickly after a permit expires or peels makes future cleanup easier. Residue that sits for months collects dust and grit, turning a clear, tacky film into a dark, gritty patch that takes far more effort to remove. Choosing a permit placement away from seals, trim edges, and direct sun exposure also reduces how much the adhesive bakes on over time.
When a professional is the safer call
Some situations are worth handing off rather than risking a DIY fix. Baked-on or brittle adhesive that has sat through multiple seasons, large-area removal jobs, early signs of tint delamination, or any hint of clear-coat damage are all reasons to stop and call a shop. If the vehicle is still under warranty, check with the dealer first, since some remover chemicals can affect coverage.
Professional detailers typically use commercial-grade heat tools, professional-strength adhesive removers, and controlled mechanical methods like pressure washing or squeegee work that go beyond what a hair dryer and plastic scraper can manage. A proper auto glass evaluation is worth the cost when adhesive removal has left pitting or damage that affects visibility, since a damaged windshield is a safety issue, not just a cosmetic one. Paying a shop a modest fee for correct removal is almost always cheaper than paying for a respray or a tint replacement later.

What permit design gets right or wrong about residue
A permit that peels clean months later is not an accident. It comes down to the adhesive formulation and where the decal sits on the glass. Permits placed too close to window seals or trim edges tend to bake on harder because they trap heat, and that makes removal rougher for the driver. A reputable manufacturer of parking permit hang tags, decals, and ticketing products offers this simple piece of advice: material and placement matter as much as removal technique. A well-made decal with a clean adhesive layer and a smart spot on the glass, away from seals and sun-baked corners, saves drivers the trouble months later. Those details rarely make it into a removal tutorial, but they are often where the problem started.
— Richard
Choosing permit decals that are easier to remove later
If you are the one ordering parking permits rather than just peeling one off, the material and adhesive you choose upfront make a real difference months down the line. Caymil designs its permit decals for durability during use and a cleaner release when the time comes to remove them, which matters for any operator fielding complaints about stuck-on residue.
- Permit decals built to hold up through weather exposure without turning brittle or baking onto glass.
- Compatibility with major parking systems, so operators are not stuck choosing between durability and system fit.
- Decades of manufacturing experience behind the print quality and adhesive formulation.
For parking operators, hotels, or facilities managing permit programs, better materials at the point of issue mean fewer residue complaints at the point of removal. Browse Caymil’s permit decal options to find a product built with easier removal in mind.
Sources
- How to Remove a Bumper Sticker | VIA (AAA)
- Removal of pressure sensitive adhesive decals — Avery Dennison (Instructional Bulletin)
- 3M Industrial cleaners and adhesive removers
- 3 steps for cleaning tar off your car’s exterior — AAA Club Alliance
FAQ
What is the most effective way to remove adhesive residue?
The most reliable approach is gentle-first: warm the adhesive, lift it at a low angle, let a vehicle-safe solvent dwell for a few minutes, then wipe with a plastic scraper or microfiber cloth. AAA’s removal guidance backs this sequence for stickers and permits alike, and testing a hidden spot first prevents surprises on sensitive surfaces like tint.
How do I get inspection sticker residue off glass?
Warm the sticker with a hair dryer, free a corner, and peel slowly at a shallow angle rather than pulling straight up. Once the main sticker is off, apply isopropyl alcohol or glass cleaner to a cloth and wipe away the remaining film, using a plastic scraper held flat against the glass for any stubborn spots.
What gets residue off price tags and similar labels?
Isopropyl alcohol or a citrus-based adhesive remover applied to a cloth usually breaks down price tag adhesive within a few minutes of dwell time. Avoid scraping before the solvent has had time to soften the glue, since early scrubbing just smears the residue instead of lifting it.
What exactly is adhesive residue?
Adhesive residue is the sticky film left behind after a label, decal, or permit is removed, caused by adhesive that stays bonded to the surface instead of lifting away with the material. Over time, it attracts dust and dirt, which turns a clear tacky patch into a darker, grittier one that takes more effort to clean.